Thursday, May 17, 2012

Earl Grey Blueberry Muffins


Let me say up front that the addition of earl grey into this recipe is still within the experimental stage. Even without the flavor of tea that I tried to extract, this muffin recipe is certainly wonderful and is my favorite (and reliable) muffin recipe. Thank you to Smitten Kitchen for sharing it!


A word about tea

Besides the green tea tofu chocolate pudding that I made years ago, I have little experience incorporating tea into cooking. With pudding, a recipe that required liquid, it was easy to steep the tea and extract those flavors. But it's a bit more difficult with muffins. In this recipe the closest you get to liquid is yogurt, but of course you'll denature yogurt if you try to heat it up. Fortunately I recalled a conversation that I had with a friend who told me about what was involved in making cannabis brownies. While the properties of tea are much different, it did make sense to attempt to steep the tea in heated butter. Sure enough, a few minutes of loose leaf tea submerged in hot butter produced a very pleasing aroma. Unfortunately this flavor did not translate as well as I hoped into the final product. 


The second method I tried was to create an extract. However, again, the results were less than stunning. This is likely due to the short length of time I allowed the extract to form. I also did not have vodka on hand so I used rum which, of course was too fragrant in its own right. Despite these shortcomings, the extract I produced did carry the scent of my tea, but perhaps it was not potent enough. Another variable could also be the strength of tea. Something that I would also like to experiment with. 

Nevertheless, I really am intrigued by the idea of cooking with tea and I think it is worth further experimentation to produce a tea muffin. If any readers have any ideas about using tea I would love to hear about them. 

This recipe comes straight from Smitten Kitchen, unmodified by myself (nothing wrong with these guys), originally adapted from Cook's Illustrated.

Makes 9 to 10 standard muffins
5 tablespoons (2 1/2 ounces or 71 grams) unsalted butter , softened
1/2 cup (3 1/2 ounces or 100 grams) sugar
1 large egg
3/4 cup sour cream or plain yogurt
1/2 teaspoon grated lemon zest
1 1/2 cups (6 3/4 ounces or 191 grams) all-purpose flour
1 1/2 teaspoon (7 grams or 1/4 ounce) baking powder
1/4 teaspoon (1 gram) baking soda
1/4 teaspoon (2 grams) salt
3/4 cup (3 3/4 ounces or 105 grams) blueberries, fresh or frozen (if frozen, don’t bother defrosting)


To steep tea, measure 7-8 tablespoons of butter (you'll lose some when straining it) then heat over the stove until it becomes fully liquidized. Then add in about 3 tablespoons of your favorite loose leaf tea.
Let the mixture steep over low heat for 5 mins (you may want to try more). Pour mixture through fine strainer press, quite hard, the leaves, to extract as much butter as possible. Let butter solidify.


Preheat oven to 375°F. Line a muffin tin with 10 paper liners or spray each cup with a nonstick spray. Beat butter and sugar with an electric mixer until light and fluffy. Add egg and beat well, then yogurt and zest. Put flour, baking powder, baking soda and salt into a sifter and sift half of dry ingredients over batter. Mix until combined. Sift remaining dry ingredients into batter and mix just until the flour disappears. Gently fold in your blueberries. 

The dough will be quite thick (and even thicker, if you used a full-fat Greek-style yogurt), closer to a cookie dough, which is why an ice cream scoop is a great tool to fill your muffin cups. 


You’re looking for them to be about 3/4 full, nothing more, so you might only need 9 instead of 10 cups. Bake for 25 to 30 minutes, until tops are golden and a tester inserted into the center of muffins comes out clean (you know, except for blueberry goo). Let cool on rack (ha), or you know, serve with a generous pat of butter."


Tuesday, May 15, 2012

Hot Dog Buns


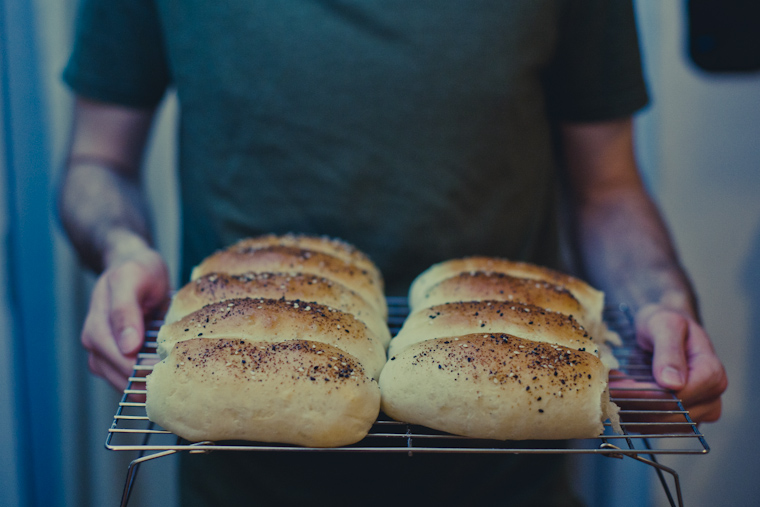
For whatever reason it is hard to find a good set of hot dog buns at the grocery stores nearby our apartment. Sometimes we have to settle for New England style buns (see photo here if you're not familiar) which, as intriguing as they may be, just don't do it for me. It was about time I tried making my own buns. So I came across this recipe from annies-eats.com. With the addition of our bagel bomb seasoning mix, this turned out to be a great batch of buns. 


Hot Dog Buns
Yield: 9 buns
Ingredients:

1 tbsp. sugar
2¼ tsp. instant yeast
¼ cup warm water (105-110˚ F)
1 cup warm milk
1 tbsp. vegetable or canola oil
1 tsp. salt
3 cups all-purpose flour (aproximately)
1 large egg beaten with 1 tbsp. water
Top with a mixture of: 
    Black Sesame Seeds, White Sesame Seeds, Onion Powder, Garlic Powder, and Poppy Seeds. 


Directions: 

In a standmixer bowl combine, sugar, yeast and warm water. Then add milk, oil, salt and 2 cups of flour. Mix on medium low with a dough hook, slowly adding flour until you get a tacky consistency where the dough has pulled away from the sides of the bowl. Keep adding flour until you achieve this consistency. In total you should have mixed for about 8 to 10 minutes. The dough should be smooth and elastic. Tacky not sticky. 

Spray or spread a bit of oil in the same bowl and replace dough. Cover with plastic wrap and let rise until doubled in bulk. About 1 hour. 

On a lightly oiled work surface, divide dough into 9 equal pieces. If you have a scale, each piece should be around 80 grams. Shape each piece into a ball first then roll into a cylinder 4 1/2 inches in length, flattening the tops a little. 

Please each bun on a cooking sheet prepared with parchment paper or a silicone baking mat. I made the mistake of placing the buns too closely together, which created more of a New England style bun. Try placing buns about 1/2 inches away from each other side by side. Cover with plastic wrap and let rise until almost doubled, about 45 minutes. Ideally the buns will bump up against each other a bit during this final rise.  

Meanwhile, preheat oven to 400 degrees F. After the buns have finished rising, brush the tops with the egg wash and then sprinkle the seasoning mix on top. 

Bake 18-20 minutes, or until golden brown. 

Friday, May 4, 2012

Garlic Tofu Sandwich


One of my fonder memories of the Northwest is eating at Paseos in Seattle. It is an amazing place to eat and definitely worth standing in the line that almost always pours out onto the sidewalk. I always enjoyed eating their tofu sandwich. It is a relatively simple sandwich consisting of tofu, caramelized onions, some romaine and a good slathering of their garlic mayonnaise but the flavor is immense.


This recipe is similar to Paseos but could use some work to get closer to their flavor. For starters, I chose not to go with the garlic mayonnaise spread, but a replica of this spread can be found here for those interested. Call me a hypocrite but while I may indulge in mayonnaise at Paseos, making it and seeing what goes in it is less than appetizing for me. However,  I would recommend trying this recipe with a product like, Vegenaise. Unfortunately I don't have access to such a substitution so I opted for a non-eggy condiment instead making more of an oil sauce:

Makes Two Sandwiches


The Bread:
A fresh baguette sliced in half
or a Pita Pocket
or your other favorite type of chewy bread


The Dressing:
1/4 Cup Olive Oil
1/2 block of tofu, cubed
5 cloves of garlic, minced
2 Tablespoons of lime juice
1/2 Tablespoon of relish (optional)
1 Teaspoon of crushed red pepper flakes, or to taste
2 pinches of salt, or to taste
2 Turns of Pepper, or to taste


The Innards: 
Caramelized onions (about 2 medium onions)
Romaine Lettuce, Fresh OR Kale, lightly steamed


Instructions for making the dressing:


In a medium size bowl, toss cubed tofu with oil, minced garlic, salt, pepper, lime juice, relish and crushed red pepper flakes.


Then pour concoction into a small oven safe bowl. Cover with lid, and roast at 425 for 40 mins.
Spoon tofu onto the bread, making sure to drizzle the excess dressing onto the bread.


Pile on a good dose of caramelized onions and top with the green of your choice.

Thursday, May 3, 2012

Pita Bread


Every now and then we have the tendency to think that any recipe involving flour will be an ordeal and not worth making for the everyday occasion. Of course some recipes are impractical to whip up for lunch, many bread recipes require a minimum of two days of preparation. Even good pizza dough falls into this category. Fortunately there are breads that can be made quickly. This pita bread recipe only requires a 30 minute rise, making it the perfect recipe if you don't have a lot of time. It is an extraordinarily simple recipe and fun to make. It is perfectly well suited for those days when you just don't feel like taking a bike ride to the bakery or making a loaf of bread yourself. I like to celebrate pita bread's versatility and sometime use it outside of the hummus/falafel circuit. Why not wrap up a veggie dog in it? Or even make a pocket of peanut butter and jelly? Today I ate my pita with black beans, cheese and salsa, but tomorrow why not try stuffing it with a spicy garlic tofu mix (like Seattle's Paseo wonderful sandwich)? On thing is clear, this is a bit more versatile than your basic sandwich loaf.


The Recipe:

1 tablespoon Instant Yeast
1 ¼ cup warm water
(about 100 degrees F)
1 teaspoon of salt
2 cups of Bread Flour (or all purpose flour, unbleached)
1 cup of Whole Wheat Flour (or white flour if desired)

Dissolve yeast in water for about 5 minutes in the bowl of an electric mixer. 

Add salt and 1 cup of the white flour and 1 cup of the wheat flour and mix with the dough hook. Then slowly add additional AP flour until a rough, shaggy mass is formed. Continue to knead with the dough hook or by hand for about 8 minutes until dough is smooth and elastic. Feel free to use enough flour as it takes to achieve a tacky, not sticky, dough.  

Turn dough onto a lightly floured surface and divide into six pieces for large pitas or ten for smaller. Shape dough into balls, then flatten with a rolling pin into ¼ inch thick discs. Try to make the thickness as even as possible. 

Let rest on the floured surface 30-40 minutes, they will slightly puff. Meanwhile Preheat oven to 425F.

With a large spatula or dough knife/paddle, flip the rounds of dough upside down on to a b
aking sheet. Bake 10-15 minutes until light golden. 

These store for up to two days well wrapped or frozen for three weeks.

Adapted from under the highchair

Stuffed with black beans, salsa, and cheese, burrito style.

Wednesday, April 25, 2012

Pizza Tourism

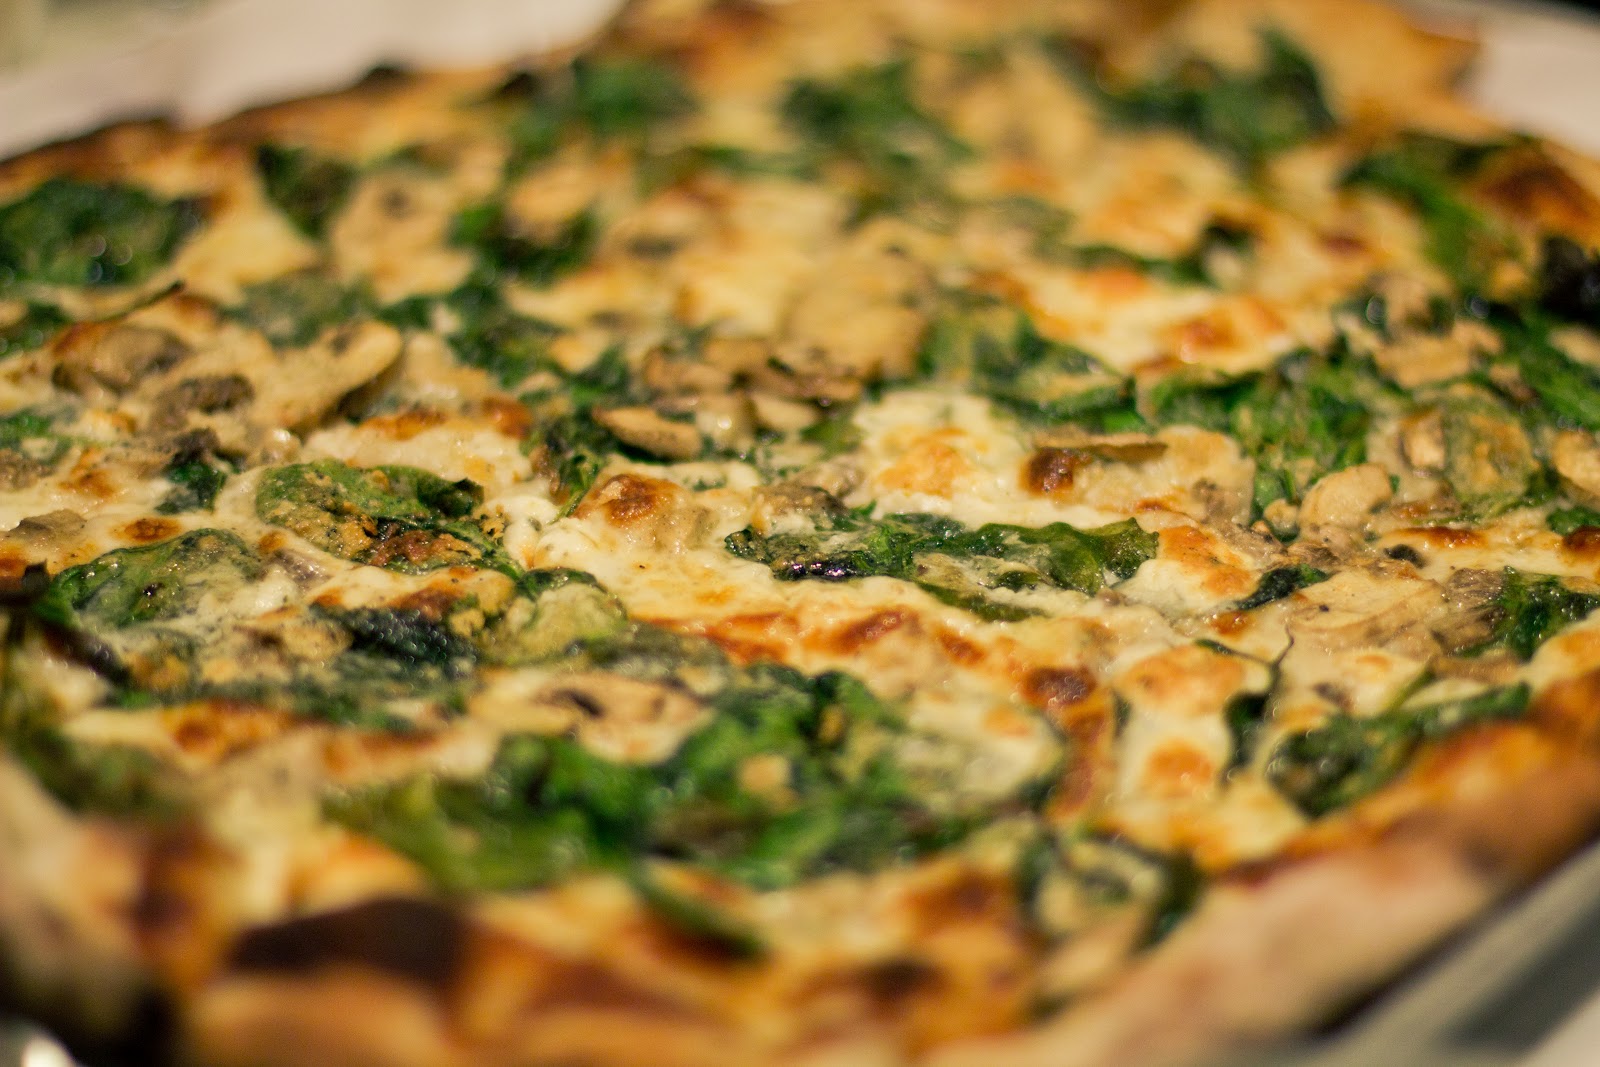
A few weeks ago I had the opportunity to speak at a conference at Yale University which meant a trip down to New Haven, CT. Now while the trip was mostly business, my friends and I had intended to make this trip a pizza tasting trip. We had hopes of eating pizza all weekend. Unfortunately we only had the chance to eat at one of New Haven's classic pizzerias. We chose to go to Frank Pepe Pizzeria Napoletana (The Spot location) or better known as Pepes Pizzeria.

Now what is interesting about Pepes is that it is known for originating the New Haven style pizza. While it is similar to Napoletana style pizza it has its own specific qualities because it is baked in a coal fired brick oven. Since Pepes opened in 1925 other pizza places have opened and serve this style pizza, even New Haven's BAR serves a similar pie. Next time I visit, I plan on checking out Sally's Apizza which is also said to serve some amazing pizza.

We left late, just after closing.

White Spinach, Mushroom & Gorgonzola Pie

Margherita Pie

Friday, February 3, 2012

Reinhart Cinnamon-Raisin Bagels in Montreal


      New York or Montreal? While the debate over which city has the best bagels persists, I suggest that you just make your own. Whatever happens it will taste great and if it doesn't live up to your expectations then try again after tweaking your recipe a bit. 
      A few weeks ago while showing a guest around Montreal we stepped into Fairmount Bagels. It wasn't my first time there, but this was the first time we picked up a bag of freshly baked bagels. Biting into a cinnamon-raisin bagel hot out of a wood fired oven while walking around in 10˚F weather did just the trick to rekindle my interest in bagels. Of course to indulge in a fresh bagel is not always a possibility or convenient, so why not try making them at home?
      Like a lot of other types of bread recipes this one involves a two day process or could possibly be condensed into one long day. Peter Reinhart, the author of this recipe, stresses the importance of the delayed fermentation to allow the bread to develop more complex flavors and cannot be recommended enough. 

Sunday, January 22, 2012

Portland Poutine


       Before we came to the poutine capital of the world we first experienced poutine at a Portland food cart. Over the past couple years, we have tasted some fine poutine in Montreal, specifically La Banquise, yet Hollin will argue that the Portland food cart Potato Champion beats all. Potato Champion does Portlandize Quebec's traditional dish. Their gravy is vegetarian and there is even a vegan option (made with faux cheese curds). Vegetarian poutine is the furthest I have seen Canadians venture. Naturally we were excited to find Potato Champion's gravy recipe. 


I hesitate to recommend eating poutine - Fries, gravy and cheese curds does not exactly fit with the Eating for the Rest of Us motto of healthy living. So eat in moderation! The upside to making your own poutine is that you can moderate what goes into your gravy. 


See Hollin whip up some poutine on a Saturday night in the video below: 


Saturday, August 20, 2011

Mango Quinoa Pudding


      It may not be the most highly regarded dessert joint, but I came to really enjoy Pudding on the Rice when we lived n Portland. Novelty perhaps but there was something very satisfying about the colorful and wonderfully sticky globs of rice that your average cup of topped frozen yogurt couldn't compete with. I have to believe this has something to do with rice pudding's certain affinity to comfort food, but a dessert comfort food. 
      As with most comfort food, rice pudding does not rate highly on the nutritional scale. But what if that white rice was switched out with a very healthy grain instead and milk was exchanged for say almond or coconut milk? In keeping with our dietary restrictions this month Hollin prepared a sugar free, gluten free, vegan dessert that really hit the spot for me - my rice pudding spot. Mango is always a great pair with coconut milk but I have to wonder what other fruits might be equally delicious to try in this recipe. 

Friday, August 19, 2011

Field Trip: San Francisco

   This past summer, we had the opportunity to visit some friends in San Francisco. Because Tartine Bakery is located in San Francisco I was especially thrilled to make this trip. Last spring I was gifted the Tartine Bread book and ever since I have desperately desired to make this bread. I've had some issues and have not completely been successful, but I was pleased to find out that the flavor that I achieved at home was similar to Tartine's own bread. If you are ever in the San Francisco area, I can't recommend Tartine enough. The croissants alone are reason enough to visit. While the staff may not be the friendliest and you will most likely have to wait in a long line that goes out the door, you'll forget about all this once you're biting into the flakiest croissant you've ever had or what I feel is simply the best bread ever produced. 
   A note about the bread. If you do plan on picking one up, you will need to know that the bread comes out of the oven at 5pm. It is said by the staff that they do run out from time to time, so be early or pre-order a loaf (or three). I highly recommend the rosemary olive bread. Don't let the $7 dollar loaf shy you away, it's a large loaf and completely worth it. 


Tuesday, August 16, 2011

Mjadra


     Mjadra, Mujadarra,  مجدرة‎, and other variants in spelling are some of the several words used to describe variations of rice and lentil dishes found in Near to Middle East cuisine. I would like to draw your attention to the Lebanese rendition, Mjadra. I first had Mjadra at Nicholas Restaurant in Portland, Oregon. I've had it since at other mediocre Lebanese / Mediterranean restaurants since but none has risen to the perfection of Nicholas'. After some research and experimentation I think I can safely say that my version comes close to what I remember Nicholas' version tasting like. Give it a try! This dish exemplifies what this blog is about: cheap and healthy eating. Lentils, Rice, Onions, Simple but a perfect way to get your lentil/brown rice protein in. Here we go: 

Ingredients

1/2 c. uncooked lentils
2 c. water
3 lg. white onions, julienned
4 tablespoons olive oil
1/4 teaspoon cumin
1/4 teaspoon coriander
1/8th teaspoon dried garlic (or use some minced fresh garlic, I don't see why not)
Salt to taste
1/2 lemon, juiced
2 cups cooked brown rice (or basmati for more of an authentic feel), (from about 1 cup dry)


1. Wash/rinse rice and cook (I like to throw in some salt and some oil (a tsp of each) for this dish). 

2. Place onions in a large frying pan with enough olive oil to fully coat the bottom of the pan. The goal here is to caramelize the onions. This can be achieved by slowly cooking them away on a medium low heat. This typically works well for me but I have seen more elaborate ways to caramelize onions these techniques will usually ask for you to add sugar, something that isn't necessary as the onions will release their own sugar. For this recipe you do not need to really add any salt in here as most caramelized recipes will call for. You'll know your onions are ready when they are brown and rather slimy.  

3. While the onions and rice are doing their thing, bring water and lentils to a boil, continue to boil for about 20 minutes or until the lentils have fully absorbed the water.

4. If everything is timed out right, you should be able to season the cooked lentils with cumin, coriander, garlic, salt and lemon juice right before throwing in the caramelized onions. If not just let things sit covered off the heat. 

5. Mix all ingredients well before topping the rice. Serve. Enjoy. 

Monday, August 15, 2011

Chickpea Salad Stuffed Bell Pepper


      After an adventurous three month vacation in California tasting culinary delights from Bouchon to Tartine, the wife and I have arrived back home to Montreal fattened and hungry still. We may have had too good of a time eating in California (not to mention the feast that was the Northwest) this summer. So the wife started speaking of a cleanse, something a friend told us he did for twenty-one days. When hearing the suggestion of a cleanse my initial thoughts were "Oh great, here comes the honeyed lemonade." But fortunately it is not one of those types of cleanses. It's actually outlines foods that are not that different than what we normally consume--well, that's not exactly true. . .

Here's what's excluded:

Dairy / Animal products of any kind (honey, gelatin, etc. )
Meat
Alcohol
Caffeine
Sugar
Gluten

I would also argue that most of these things should be excluded at all times, so why not go along with the wife and try this cleanse. The weak spot for me is gluten, I love bread and cannot be fully convinced of the damage a whole wheat loaf might inflict. Yet like undergoing any such diet it is important not to think about the can't haves and more about what the regiment will force you to explore. With this type of thinking I do not simply bump wheat off the list but instead add something like quinoa, a grain I typically do not get enough of.

I want to share a dish that Hollin found and adapted a bit from the ever delicious Smitten Kitchen. I loved this stuff. Light, refreshing and somewhat creamy, and reminiscent of potato salad.  And it is not only because it's vegan and gluten free that it is something to get excited about, it's tremendously flavorful.

The Ingredients:


1 15-ounce can chickpeas, drained and rinsed
2 tablespoons pitted, halved and very thinly sliced black olives
1 tablespoon finely chopped red onion
1 tablespoon chopped fresh parsley or basil
zest and juice from half a lemon
couple good pinches of salt
a few grinds of black pepper
3-4 tablespoons of Olive Oil
2-3 red bell peppers, halved (for serving).


1. Simply mix all ingredients mashing up the chickpeas slightly with a fork or potato masher, just enough to form a texture similar to that of potato salad.

2. Dish into the bell pepper boats. Enjoy.


Thursday, August 11, 2011

Pizza Napolatana


Video accompaniment for a previous recipe and method I posted back in December. You can find it here: Pizzette Neapolitan

Sunday, May 29, 2011

EFTROU Video Series Coming

Ever since I began baking bread I have noticed how difficult it can be to learn by reading about the process of breadmaking. I suppose this is a fairly obvious observation to make considering that we always hear about the best bakers making a pilgrimage to the French countryside and apprenticing with experienced boulangers. The process involved in some food preparation can just be too complex to express verbally. 

It is no surprise that there are countless hours of food making videos posted on YouTube alone. Food videos have grown especially prominent showcasing recipes, techniques and often just food porn. I think the best food videos combine all of these elements (yes, even food porn can be important if it functions to provide a motivation for cooking). So while food videos are by no means new, I would like to contribute to the body of cooking videos by making a few of my own. So hopefully over the summer I will be able to post a few recipe videos. Right now, I am in the process of editing a video demonstrating the method for my favorite pizza recipe. Today I put together a trailer to kick off this series. I promise that the future videos will offer better soundtracks (probably one that I didn't compose), but as for this trailer, just have fun with it. 


Eating For The Rest Of Us Video Series Trailer from Eric Whedbee on Vimeo.


Friday, April 22, 2011

Spring Chili


      As I had mentioned in a previous post, I have been trying to find a good chili recipe. My search subsided after I found the chili recipe that I had posted previously even though I was not completely satisfied by it. Perhaps it was because the weather started to change as spring approached (it's still approaching here in Montreal) but I forgot about my quest for a good veggie chili recipe. But as with the best recipes, they usually just fall into your lap, through experimentation or from something as simple as talking to your mom on the phone. Recently I was on the phone with my mom and she told me about some chili recipe that she had heard about and tried. It sounded amazing so I soon found myself at the store gathering some simple ingredients including an orange. Yes, an orange for chili. This, my friends, is a sweeter chili than we are usually accustomed to. It's perfect for the spring time when you are still looking for something to warm you up during a cool evening.


      As you can see, I chose to serve the chili on french fries. I hesitated to show this one on a blog that prides itself for healthy eating choices, but the wife and I often eat chili this way especially when we are a little burnt out on having rice (typically we eat brown rice 5 or so times a week). Perhaps the desire to eat it on french fries also has something to do with nostalgia I have for the cafeteria that we ate at together in college. They would often have a "fry bar." This would consists of fries, beans, tomatoes/salsa, sour cream etc. Basically your average taco condiments but served on a nest of fries. It may sound a little repulsive, but I have to admit I looked forward to "fry bar" day at the cafeteria. This exceeds the bland bean blend at the cafeteria and even my beloved Trader Joe's canned chili on fries. The sweet potatoes and the orange zest in this dish affords this chili a very flavorful (and healthy) melange despite the simplicity of the recipe. 

The Ingredients:

2  T. vegetable oil
1 large onion chopped
1  T. chili powder
1/2 t. ground cumin
2 Cups chicken or vegetable broth
2 medium sweet potatoes, peeled & cut into 3/4-inch cubes
2 (14 1/2 oz.) cans diced tomatoes in juice
1 (15 1/2 oz.) can black beans, drained & rinsed
2 t.orange zest
salt & pepper

1. Heat the oil in a 4-6 qt.dutch oven or saucepan over medium heat.

2. Add the onion and cook, stirring often, until softened, about 5 minutes.

3. Stir in the chili powder and cumin, then add the broth and sweet potatoes and stir well to combine. Bring the mixture to a gentle boil, the cover the pan, reduce the heat to low and simmer until the potatoes are almost tender, about 15 minutes.

4. Add the tomatoes and beans and to simmer, uncovered, until the mixture is heated through and slightly thickened, about 15 minutes more.

5. Stir in the orange zest and season to taste with salt and pepper. 

Serve the chili atop brown rice or french fries. Optionally top with green onions, cilantro and/or sour cream.

Saturday, February 26, 2011

Baking Supplies

Baker's Supplies

Inspired by the Tartine Bread book that I recently acquired for my birthday, I am rounding up my bread making tools. This is a list of supplies that will get you going on your quest to make a beautiful artisan loaf.

Tuesday, February 1, 2011

Vegan Brown Rice Waffles


I was a little hesitant about whipping these waffles up. I've never made batter from brown rice but the method seemed interesting so I became curious to see if the waffles would actually turn out. Not only did they turn out, they are quite tasty. 

This recipe requires that you start the batter the night before by soaking the brown rice. You'll be happy about this when you are rushing to make breakfast before work. As a note, you can easily make this recipe gluten-free by substituting conventional vanilla extract with a gluten-free extract such as McCormick's Vanilla Extract. Better yet, use vanilla bakery emulsion instead of extract altogether to ensure a gluten-free recipe. (recipe after the jump)

Friday, January 14, 2011

Cherry Tomato Trofie Liguri


       Recently a friend of mine gave me a box of Trofie Liguri pasta. He purchased this pasta rarity (at least I've never seen this type before) from an Italian specialty shop in NYC. The shape is interesting- it's essentially a rolled up pasta. I have been looking forward to making a dish with it ever since I laid my eyes on it. We decided to go with an old family standard. Perhaps our favorite pasta dish. The unique shape of the Trofie Liguri pasta provided the perfect pasta-to-sauce ratio. This recipe was shared with us by sister Keiko. Her talents extend far beyond providing us this great recipe, you should check out her blog A Small Adventure to see what she's been up to. 

Friday, December 24, 2010

A Wassailing We Shall Go!


This beverage is a Christmas family tradition. My mom shared this recipe with me and I always associate this cider with our German heritage. While this mulled beverage presumingly dates back to medieval Europe, it is more associated with Old English heritage - luckily friends, I am half German and English so I can still claim this one as part of my heritage! As I gather from Wikipedia, the etymology summons the yule time as a time of new beginnings. The word itself is a contraction of the Middle English phrase wæs hæil  which translates to "good health" or "be you healthy." On top of that the verb Wassailing refers to an English tradition as well that I don't have the space to go into but is quite interesting as well. 

So if you are opting out of mulled wine this year, you will find that Wassail is a great non-alcoholic alternative. I suggest filling up your thermos and taking it along with you as you search out a quiet lake to ice skate on or porting it to your family dinner this season.

Recipe:
12 cups apple juice

1 cup orange juice

6 cups pineapple juice

12 oz. apricot nectar

6 cinnamon sticks

1 tsp. cloves

     Stir all ingredients in large pot.  Heat slowly till simmering.  Continue for one hour.  Remove cinnamon sticks and cloves.  Serve HOT.


Monday, December 20, 2010

Pizzette Neapolitan: where in which I ditch my pizza stone for a skillet


      Since my last pizza post, I have periodically been experimenting with dough recipes and perfecting my technique. If you search around online you'll notice that there's a lot to learn and to keep up on- as there are currently theories being tested regarding best methods and fermentation processes etc. for home pizza making. This should not be new territory if you have been involved with other types of bread making. The objective I have taken lately is to perfect the simple, to meet the bar in pizza making: the margherita pizza, the essence of Neapolitan pizza making.

Saturday, December 18, 2010

Red Bean Tofu Vegan Chili


A couple years ago I developed a habit of eating Trader Joe's vegetarian Chili. It was a simple but delicious meal. I would just cook up some brown rice and overturn the can upon the heap. At that time I wasn't even that crazy about spicy food. However, it was an inexpensive meal and the beans and brown rice formed that holy grail of vegetarian protein. Ever since I began eating chili, I felt like this would be something I could easily make from scratch but I never got around to it. That is until I moved to Montreal and situated myself miles and miles away from Trader Joe's. So the search began for a great vegetarian recipe. Fortunately I didn't have to search too far. Smitten Kitchen, a blog that I periodically peruse, featured a ground beef recipe that looked great. Hollin and I thought we would give it a try. We ended up with a chili that was unbearably spicy- it was really something we couldn't eat. Now, I'll admit that neither of us are really that keen on spicy food, but I'm not sure how anyone could eat it. The upside to the adventure was that we thought this recipe nailed the flavor that we were accustomed to and striving to recreate. So we tried it once again. This time we completely cut out the chili flakes and significantly reduced the amount of chili powder. 


I also want to stress that this recipe is quite easy and doesn't take too long to make. The best part is that it yields so much chili. You can easily freeze it so you always have some on hand. Also, what is fantastic about making your own chili is the fact that you control what goes in it. You'll most likely use far less salt than canned chili. Lastly, you'll save quite a bit of money if you are used to buying cans of it. Even the inexpensive Trader Joe's Chili is more expensive than this recipe. 

Recipe

Serves 6
2 large onions, chopped (about 3 cups)
1/4 cup olive oil
1 tablespoon minced garlic
2 carrots, chopped in a small dice
1-2 pounds of crumbled firm tofu (extra firm and medium would work too). It works best to run the      tofu through a food processor to achieve a ground beef consistency.
1 tablespoon ground cumin
2 tablespoons paprika
1 tablespoon crumbled dry oregano
*Dried red pepper flakes to taste, if you feel it necessary, I chose not to.
2 8-ounce cans tomato sauce or 2 cups fresh tomato sauce or tomato puree
1 1/4 cups of vegetable broth
3 tablespoons cider vinegar
1 3/4 cups or 1 19-ounce can red beans, rinsed and drained
2 green bell peppers, chopped

This recipe is adapted from Smitten Kitchen 

Directions:

1. Begin by heating up the olive oil in a large pot over medium low heat. Use a pot that is 5 quarts or larger if you plan on making the full recipe.

2. Sauté chopped onions until they begin to become translucent (5-10 mins). Meanwhile mince garlic and chop carrots.

3. Add garlic and carrots and cook for about 1 min.

4. Increase heat to medium and add the tofu, chili powder, cumin, paprika and oregano.  Cook for another minute. 

5. Add the tomato sauce, broth and vinegar and simmer the chili, covered, for 20 minutes.

6. Add the red beans, bell peppers, salt and pepper to taste and simmer for an additional 10 minutes, or until the bell peppers are tender.


Serve over brown rice and with a dollop of vegan sour cream (tofutti).